Hatching & Raising Baby Chicks
Or, Growing Your Own

Velvet Sparrow
Hatching your own chicks is relatively easy once you do some reading up on it and
are prepared, and VERY rewarding and exciting. It's especially fun and fascinating
for kids. YOU MUST PROTECT THE CHICKS! That means if you are raising them indoors,
make space in your kitchen, bathroom, etc. for the brooder box-
Be ready with a few things: A good sized brooder box sufficient to hold mama (if
there is one) and babies for two months if needed, a tip-
Egg Turning Chart
 >
>
Jack’s Henhouse
 >
>
Jack’s Henhouse
Incubation
If you are letting a hen hatch the eggs and she is still in with the rest of the flock, mark your eggs to be hatched with a pencil so that you'll know which ones are your hatching eggs and which are new eggs laid by other hens. If you are using an incubator, with pencil or a Sharpie (ball point pens can puncture eggs but the ink itself on the shell is no danger) mark an X on one side and an O on the other, this helps to tell you which side should be up at each turning if you turn the eggs by hand. It also helps you keep track of which eggs you have turned this time! Eggs MUST be turned during the incubation process or the chicks will stick to the inside of the shell and die.
Broodys turn their own eggs, but if you are using an incubator either buy an egg
turner to go with it or turn the eggs 3-
You WILL worry about them as they incubate and during the hatching process, so try
to resist the urge to check them every 5 minutes-
There are many types of incubators on the market, ranging from little three egg units to styrofoam tabletop models to cabinet incubators. What type you use is up to you and how much you want to spend. Research them and you’ll come up with the one that is best for you.
I have personally used the tabletop Little Giant styrofoam incubators, both still air and forced air, for years with unpredictable results–sometimes great, sometimes really poor, most of the time somewhere in the middle. Recently I upgraded to a small tabletop cabinet incubator, a ReptiPro 6000.
Here are my two Little Giant styrofoam incubators in place. On the wall is my turning chart that I have been marking the egg turnings on for the last 21 days. There is also a sheet listing the various breed eggs I was hatching. Each incubator has clear plastic viewing panes built into the top.
The automatic egg turner loaded with eggs and placed inside the incubator. The turner is removed for the last three days of incubation. The purple thing is a ‘water weasel’ toy, the probe for the thermometer goes inside it. The Water Weasel simulates an egg, giving you a more accurate reading of the temperature INSIDE the eggs rather than of the air surrounding them, making for a better hatch.
A styrofoam incubator with eggs laid directly on the wire mesh bottom, the only egg turner in this case was me! There is a blue Water Weasel, the digital display device is a thermometer/hygrometer. The eggs are marked with an X on one side and an O on the other, and in this case were numbered as well so people watching the hatch on Chickam could ID them.
The tabletop cabinet incubator, a ReptiPro 6000. This incubator was manufactured for herpetologists to use, but the poultry community quickly discovered it. It has the advantage of maintaining temperature/humidity control better and recovers to the correct temperature quickly after the door is opened. I chose not to go with an automatic turner with mine since I was opening the door several times a day anyway to allow fresh oxygen IN and carbon monoxide OUT–the ReptiPro doesn’t do this on it’s own. I hand turn eggs in this unit 5 times a day for 18 days. You stop turning eggs after that and they hatch at day 21.
The water weasel, temperature probe and hygrometer all work the same way as in the styrofoam models.
The Brooder Box
Baby chicks do not require a mama hen, but if you don’t have one they will bond to YOU as mama. So you can go two ways: Have a broody hen hatch & foster the chicks or not.
If you go old school and allow a broody hen to incubate, hatch & raise chicks herself,
her needs are pretty simple. Number one is SAFETY. She needs to be isolated from
the rest of the flock. Incubation takes 21 days, and she will only leave the eggs
for short 20-
Or you can hatch the eggs in the incubator, then recruit a broody hen to be mama–and
it MUST be a broody hen, if you try this with any old non-
So let’s say you have a hen who went broody and your eggs in the incubator are hatching, and you want to get these two together. Terrific. After the hatch is done and your chicks are dried out and in the brooder box, but no more than a day or so old, bring in your broody hen and allow her to see the chicks, either while you are holding her or let her view them through the wire window of the brooder box. Her reaction should be one of interest, and she may start clucking at them and fluff up a bit. As long as her first reaction isn’t to run off or attack them, you can move on from there. Make sure you have a heat lamp on the chicks right up until you are ready to place mama in the box–they MUST have the warmth or either mama or the heat lamp.
Since chickens pretty much shut down as soon as it gets dark, mama will be quieter and more docile then. Wait until dark to take the next step, but have everything in the brooder box ready to go as far as food & water–you’ll be putting mama into the box in the dark, sticking the chicks under her and leaving them in the dark & quiet overnight with no disturbances. Done right, by morning she is mama and they are her babies. Use a small flashlight sparingly (one with a red lens works great) as necessary for you to see, but don’t give mama so much light that she can see to peck the chicks or for the chicks to wander out from under mama. Place mama in one corner of the box, she should naturally settle in and sit down. Start gently stuffing chicks under her wings, she and the chicks will naturally arrange themselves comfortably. The chicks don’t care that they don’t know her, she’s just a warm fluffy thing and they’re happy. Stay right there and listen with the flashlight off. Mama hen should just sit and cluck or purr softly in the dark, if you hear any scuffling or the chicks screaming because she’s attacking them, use your flashlight and rescue chicks. If mama is steadfast in her refusal or abuse of the chicks or keeps getting up and moving away from them, remove mama and do without her.
But usually broodies accept the chicks and vice versa–she doesn’t know or care that
these are not her natural chicks, she’s just happy because OMG CHICKS. An experienced
mama is best, but first-
To Mom Or Not To Mom?
The Little Giant and ReptiPro incubators side by side. This was my first time using the ReptiPro, so I had the styrofoam unit running too, so it would be ready in case the ReptiPro failed. Fortunately it wasn’t needed.
The whole setup–two incubators and the brooder box set up and ready two days BEFORE the hatch–because sometimes Mother Nature has her own schedule and surprises you with early birds!
The brooder box was a repurposed water heater box with a window cut out and covered with hardware cloth. Black plastic is under the box to help protect the floor. Wood shavings are inside along with an old gooseneck lamp for warmth. Food and water dishes will be added when chicks are.
Or you can go old school and use a hen!
In this case, when I tried to run a second hatch, my ReptiPro unit failed 5 days before hatch, and my styrofoam unit wasn’t ready–but Sonic, my golden laced Giant Cochin was! She was broody anyway, so I grabbed the nearest cardboard box and whacked her together a nest box. She completed the incubation in a corner of my living room, and hatched and raised 5 chicks.
It wasn’t until later that I realized how perfect this particular box was. Hens know best!
Which brings us to…
The brooder box must include a firm surface for the chicks to run on-
I run my chicks on shavings with a nice firm cardboard underneath for the first week
or so until they get a little bigger and stronger, then either keep them in the large
brooder box or switch to a hardware cloth (wire) footing, which is easier to keep
clean. I have a large bird cage with a finely-
Yoya the gray Giant Cochin hen, happily fostering 12 baby chicks. The grassy dirt clod is green matter to eat, provides grit for the chicks, maybe yummy bugs in the roots, a fun & entertaining toy to dig in and leap on your sister’s head from, and dirt for dustbathing in.
Chicks often climb on & peck at the wattles & comb of their mama , who tolerates all this nonsense for weeks.
You get an entirely different dynamic with a mama hen with your chicks–they will be less bonded to you, but watching a mama hen interact with her chicks is not to be missed.
Mama provides all the warmth the chicks require, but I left the flamingo lamp in the brooder box just in case. Also, it is tradition with Chickam fans!
Of course, as the chick get older, mama becomes anxious to get them out of the box and into the wide world!
Yoya kept to her duties as mama for 6 weeks,at which time both she and the chicks began to lose interest in each other. When she began pecking them away from her, we removed her and returned her to the flock, and the chicks did fine without her at that point.
 >
>
Jack’s Henhouse
 ">
">
Jack’s Henhouse
 >
>
Jack’s Henhouse
 >
>
Jack’s Henhouse
 >
>
Jack’s Henhouse
 >
>
Jack’s Henhouse
 >
>
Jack’s Henhouse
 >
>
Jack’s Henhouse
 >
>
Jack’s Henhouse
Obviously, if you have an incubator with an automatic turner, you will not have
to track when the eggs were turned–otherwise this chart is very useful. I have included
a picture of the egg turning chart I use, I just tape it to the wall next to the
incubator along with a pen. Every time I turn the eggs, I mark the chart with either
an 'X' or 'O'-
At the very bottom I have noted how many eggs from each mother hen I have placed-
 >
>
Jack’s Henhouse
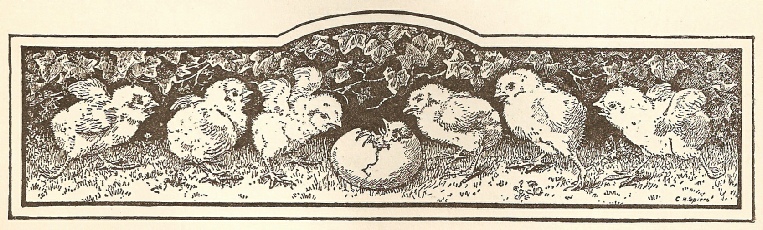
Yay, They Hatched!
Oh God, Now What?!
Baby chicks need your help even if they have an adult hen for a mama. With no mama
hen YOU are mom and need to protect and teach the little ones. Appropriate food such
as chick starter or grow mash needs to be placed within easy reach, and waterers
should have marbles placed in the trough so that accidental drownings do not occur-
If the chicks will be kept indoors, say in a large cardboard box, they will need
some diversion. In the brooder box picture you'll notice that I've cut a window for
the chicks to see out of and covered it with a piece of hardware cloth, which was
placed on the OUTSIDE of the cut-
Hatching underway! Eggs hatching and chicks at various stages of drying out. As chicks dry out and get stronger, they will stumble about in the incubator, kicking around the unhatched and pipping eggs like soccer balls. Don’t worry, even though it can seem quite violent, it’s normal and stimulates the other eggs to hatch.
Another brooder box all set up and ready for chicks.
As the chicks grow and develop their wings, you'll also want to fashion a wire cover
for the TOP of the brooder box-
Boredom, overheating and overcrowding can cause chicks to peck each other. I give
my chicks a great big, nasty, grassy dirt clod-
Another advantage to the wire window is that the chicks can see and experience things happening around them, and some of your calmer, trusted adults can be safely brought in to visit–through the wire–the new chicks. It helps everyone realize that there are other chickens and makes the chicks’ introduction to the flock much easier. Meet & Greets start early!
Millie the MilleFleur Belgian d’Uccle hen visiting the baby chicks. This is the safe way to hold initial Meet & Greets.
I also give my chicks table scraps diced into non-
If the chicks seem droopy or are not thriving, you can replace their drinking water
with electrolyte solution (see the ‘Health’ section) or unflavored Pedialyte (from
the baby aisle in the grocery store). It provides electrolytes which helps give
the chicks a boost-
 >
>
Jack’s Henhouse
 >
>
Jack’s Henhouse
 >
>
Jack’s Henhouse
Sexing Baby Chicks
Some breeds are referred to as 'sex links'-
Failing that, you can tell a BIT by close observation of that brooder box full of unsexed chicks down at the feed store. This is all my experience talking here and isn't scientific at all.
As a rule, the roos will be out in front, facing you and being curious. Hens will be more shy and retiring and will stay at the back of the group. Baby roos will be friendly, colorful, have larger, redder combs and be that one chick that is your favorite bird (it never fails). If you pass your hand over the heads of the chicks or sail a soft, flat object such as a beret or wave a piece of paper over the chicks, the roos will stand up tall and peep loudly, the hens will hunker down and get quiet. That is because they instinctively do this in response to a predator threat such as a hawk. Hens don't want to be picked up, roos run over to you to be picked up. When you leave the room or otherwise get out of sight, that baby chick that starts yelling loudly for you will be a roo.
 >
>
Jack’s Henhouse
Introducing New Chicks To The Flock
I always hold several of what I call "Meet & Greets". I've found that this is a great way to introduce new chicks to a flock. That is, I directly supervise the introduction, and anyone who gets out of line gets 'pecked' by ME, since I am the Head Hen/Roo. I keep these supervised visits short (about 20 minutes or so) and do it for about three days to a week. After that I put them all together for good. It cuts down on the violence you get otherwise when you just toss 'em all together. There is still the establishment of the pecking order, but that's a given anyway.
I generally show the existing flock the new chicks when the chicks are a couple of
weeks old. I keep chicks without a mama hen in a wire bird cage and put it down on
the lawn with the flock around. This way they see them and know that they are there
and can safely come up and check them out, and the chicks are safe inside the cage.
I stay and supervise, making it clear that these chicks are MINE and are under MY
protection. Speak soothingly to the flock and praise them as they look disgusted
at these new upstarts. After the chicks get to be about a month old you can do this
without the cage, but still stay and supervise! This is the most important part
where some pecking can be attempted by the older birds, don't you allow it! Reward
good behavior with a soothing, praising tone of voice and chase off any bullies.
You are the Head Roo, remember, and these are YOUR BABIES. After you take the babies
back into their brooder, spend some time with your flock praising them and passing
out goodies to help sooth hurt feelings and reinforce your position as parent, provider
and god. Chickens DO experience emotions the same as you and I, and jealousy is
one of them. I always turn my chicks out into the cold, cruel world of flockdom
at the age of two months, but not before then. If I have a broody hen who has raised
the chicks I keep her and the chicks in their own pen for the first couple of weeks
to one month to avoid problems from over-
As for teaching the new chicks where they should roost for the night, a good way
to do this is to step into the coop a couple of times during the day with little
treats and give it to them in there (be careful not to cause a stampede for goodies
where the little ones could get hurt), or place the food and water in the coop so
that they have to enter it to eat, and will associate the coop with pleasant things.
I just leave my coop door propped open during the day, with food and water kept inside
and the chickens come and go as they please. My chicks never had a problem with instinctively
following the flock and going to the coop to roost, but then in my yard the coop
is the best place to roost so they prefer it. Of course, there's no harm in showing
them where to go, and I'd certainly be out there the first couple of nights and watching
at dusk to see if they go into the coop on their own or are bullied if they try to-
Here’s what you DON’T want:–this is 12 youngsters that had crammed themselves between a next box and the outer wire their first night in the coop, I’d gone out just after dark to check them and found them thus:
 >
>
Jack’s Henhouse
Expect some squabbles at first and the chicks to be roughly shoved off the roosts, where they will huddle on the ground for the night. Don't worry too much, they’ll get it, things will work out in time and all should be well.
 >
>
Jack’s Henhouse

Enjoying the chickens? Has my site helped you?
Want to buy the chickens some goodies?
Click the button!
 >
>